|
Review:
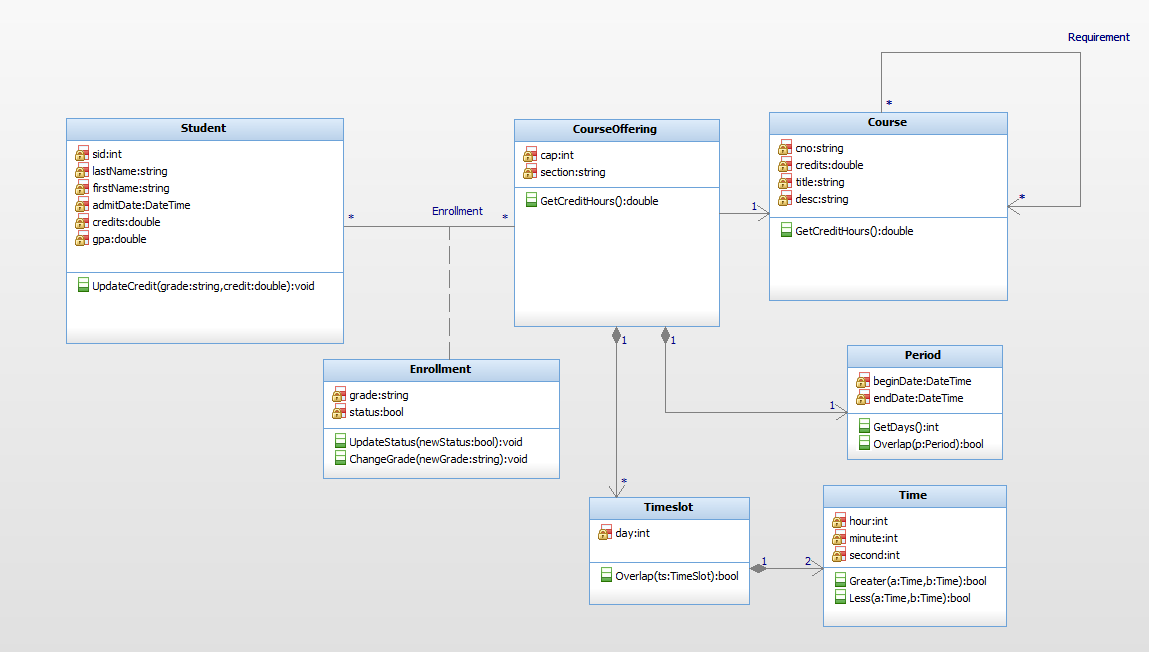
Exercise 1: Code the following class diagram

Exercise 2: Create a use case diagram for POS
Use Case Storyboarding:
- Structured English to describe the procedure of performing a use case. So it is a procedure model
- Serves as a contract between the developer and the business, and so the quality is critical to the success of IS project. Thus, it must go through a validation process to be reviewed, inspected, and signed off
- Adopt a template as the guideline
Concepts in Storyboarding:
- Basic Flow: A sequence of interactions under the most common scenario to finish performing the use case
- Exceptional Flow: A sequence of interactions under a rare scenario that lead the failure of the use case
- Alternative Flow: A sequence of interactions under a rare scenario that prevents an original flow to go on but the user can perform a workaround and back to the original flow to finish the case use
Simple Guidlines in Storyboarding:
- Use active sentence to describe each action by a user or the system
- Use short, simple sentences
- Use consistent names throughout
- Don't forget each interaction is between the user and the system. These are not: Waiter greets customers; a customer loads a basket of good on the checkout stand; the cashier hands out the change to the customer; the cashier helps the customer to unload goods, etc.
- Don't forget two-way interactions: the user and the systems take action in turn
- Don't forget scenarios under which the flow may not go on smoothly
- Don't forget the help from the secondary actors
Label Conventions in Storyboarding:
- Each sentence is uniquely labeled. Basic Flows are labeled as 1, 2, 3, etc. Alternative or exceptional flows are labeled as .1, .2, .3, etc.
- Each flow is identifiable: one basic flow and zero or more alternative and/or exceptional flows,. Each alternative or exceptional flow has a unique label along with a short description of the scenario. For examples, assume "6. The visa center validate the pin number" is a step in the basic flow. Then the following are the example of how to label alternative and exceptional flows:
6a: invalid pin
6b: account on hold
If there are further alternative or exceptional scenarios out of any of these steps, for example, out of Step .2 of 6a there is a scenario that the card holder enters more than three times of incorrect pin number, then these scenarios may be named as
6a.2a: two many pin errors
Example: Describe the use case "checkout items" in the POS
- Key sections in a template: Basic Flow, Alternative Flows, Exceptional Flows, Business Rules, User Interfaces, and Messages and Prompts
- Each item in the shared section is uniquely labeled and the label is reference in the description
Example: UI for Checkout Screen Design in Visual Studio:
Learn how to use list view box, picture box, labels, command buttons, calendar controls, combo box, radio buttons, check boxes, menus, etc.
Simple Controls using C#:
- Text Box -- Show and edit text
- Labels -- Show non-editable text
- Buttons -- for performing actions or commands
- Radio Buttons -- Show and select a few choice of exclusive values
- Check Box -- Show and select a few choices of non-exclusive values
- Combo Box - Show and select limited number of exclusive values
- List Box -- Show and select limited number of non-exclusive values
- Tab Controls -- Organize controls into different pages
- Panels -- Organize several controls into one unit
- Group Box -- Group multiple radio buttons into an exclusive group
- DateTimePicker -- a text box with built in calendar
- ListView -- Show and edit a list of objects in multiple columns
- DataGridView -- Show and edit data as a table
Prototype Item Basket using Data Grid View:
- Add a datagridview control to a form canvas and name it dgvItems
- Add two button columns for Delete and Edit items in the basket
- Create a DataTable with columns and rows and use the DataTable object as the data source for the dgvItems:
            //prototype data grid view
            DataTable dt = new DataTable();
            dt.Columns.Add("SKU",typeof(string));
            dt.Columns.Add("Description", typeof(string));
            dt.Columns.Add("Price", typeof(double));
            dt.Columns.Add("QTY", typeof(double));
            dt.Columns.Add("Sub Total", typeof(double));

            DataRow dr = dt.NewRow();
            dr["SKU"] = "01-23456";
            dr["Description"] = "Apple Iphone X";
            dr["Price"] = 999.99;
            dr["QTY"] = 1;
            dr["Sub Total"] = 999.99;
            dt.Rows.Add(dr);

            dr = dt.NewRow();
            dr["SKU"] = "01-23423";
            dr["Description"] = "AApple Macbook Pro 256GB 13.3";
            dr["Price"] = 1999.00;
            dr["QTY"] = 2;
            dr["Sub Total"] = 3998.00;
            dt.Rows.Add(dr);

            dgvItems.DataSource = dt;

Prototype Produce (without bar code to scan?) using Imaged Combo Box
Standard combo box does not allow images as items. In order to show list of non-scannable products such fruits and produces using pictures, we can use a panel with multiple clickable pictures to select the item to weigh or a combo box of pictures to select. Here I use an extended combo box (download the file ComboBoxExtension.cs from ecourse.org script loader). Here is the detailed instructions on how to use custom extensions:
- Create a new windows form or web project and then go to Project --> Add Existing Items to include ComboBoxExtension.cs into the project
- Build the project and you will see two new custom controls added to the ToolBox: ColorSelector and ImagedComboBox
- Drag ImagedComboBox to a form canvas and named it imageCBOProduce
- Add a few pictures, e.g., 1.png, 2.png, and 3.png, into the project bin/debug or bin/release folder
- Write code as follows to add the pictures into imageCBOProduce
    imageCBOProduce.Items.Add(new ComboBoxExtension.ComboBoxItem("Apple", Image.FromFile("1.png")));
    imageCBOProduce.Items.Add(new ComboBoxExtension.ComboBoxItem("Pear", Image.FromFile("2.png")));
    imageCBOProduce.Items.Add(new ComboBoxExtension.ComboBoxItem("Grape", Image.FromFile("3.png")));
    imageCBOProduce.SelectedIndex = 1;

Homework:
- Reading: Chapter 10 of LIU(2020)
- Exercises: Correctness Questions: online; Hands-on Questions: Question 2 of Chapter 10
|