TensorFlow is one of the two important extensions to Python for machine learning (the other one is PyTorch created by Meta). However, its installation can become complicated given various conflicts between different versions of dependent packages. The problem gets worse if we want to take advantages of GPU computational capabilities. Adding on the top of the complexity, google announced that TensorFlow 2.10 was the last TensorFlow release that supported GPU on native Windows. Starting with TensorFlow 2.11, we have to install TensorFlow in Windows Subsystem for Linux. This instruction provides an easy to follow and verified approach to TensorFlow 2.10 to Windows 10/11 for Python 3.9.
Check the list of CUDA®-enabled GPU cards to see if you have a supported graphic card. If not, please follow a simpler guideline to install Tensor Flow without GPU support.
Install NVidia CUDA Toolkit and cuDNN on Windows Native:
This step is necessary to install Tensor Flow or PyTorch with GPU support. It will install a system-wide CUDA Toolkit and cuDNN libraries to compile binaries using Visual Studio. It is wrong that you don't need them if you can download Python CUDATOOLKIT and CUDNN binary packages. I encountered the problem with GPU memory resource errors when I didn't install system-wide CUDA Toolkit and cuDNN for Visual Studio.
- Check the list of CUDA®-enabled GPU cards to see if you have a supported graphic card. If you do, remember its compute capability and go to CUDA Toolkit Archive | NVIDIA Developer to download its matching CUDA Toolkit and matching version of cuDNN based the version of CUDA Toolkit: cuDNN Archive | NVIDIA Developer. (CUDA Version 11.2 and cuDNN version 8.1 are recommended unless you have older and latest GPU. See the bottom of this page to decide CUDA and cuDNN version if you have a very old or very advanced graphic card.)
- Make sure you have installed the most recent NVidia Game Ready driver for your GPU card (just Game Drive, not NVIDIA Frameview SDK and NVIDIA PhysX. Go to Control Panel to uninstall them if you accidently installed them).
- Install Visual Studio 2017 or 2019 (older version or newrer version will not be compatible with the suggested CUDA Toolkit and cuDNN versions. If you already have Visual Studio installed, make sure you open Visual Studio Installer and modify to include C++ language compiler (see the photo below for choices). If you don't have it, you can download the visual studio installer from https://visualstudio.microsoft.com/downloads/. Double click the file and make sure that you have the highlighted (“Desktop development with C++”) workloads installed. This will install the required C++ toolchain

- Install CUDA Toolkit 11.2 and cuDNN version 8.1.0 for TensorFlow 2.10 in Python 3.9 . TensorFlow 2.10 is the last version to support native Windows.
- Install CUDA Toolkit by double clicks on the downloaded file and follow the screen instructions to finish.
- To install cuDNN, follow link https://docs.nvidia.com/deeplearning/cudnn/latest/installation/windows.html. Here are the key steps:
- Use Windows Explorer and go to c:\Program Files folder and create sub folders as c:\Program Files\NVIDIA\CUDNN\8.1.
- Open the downloaded cudnn-11.2-windows-x64-v8.1.0.77.zip and copy everything under CUDA folder to c:\Program Files\NVIDIA\CUDNN\8.1
- Move the contents under C:\Program Files\NVIDIA\CUDNN\8.1\lib\x64 to C:\Program Files\NVIDIA\CUDNN\8.1\lib
- Add C:\Program Files\NVIDIA\CUDNN\8.1\bin to your System Path variable
Install Miniconda with Python 3.9:
Python versions compatible to Tensor Flow library are 3.9-3.11. Install Minconda with Python 3.9: download Miniconda3-py39_23.5.2-0-Windows-x86_64.exe for the version that comes with Python 3.9:
- Choose to install for all users and file location as C:\ProgramData\miniconda3
- Check the checkbox "Register Miniconda3 s the system Python"
- Add Anaconda binary code folder C:\ProgramData\miniconda3\condabin to the system PATH.
Install Tensor Flow 2.10 for R:
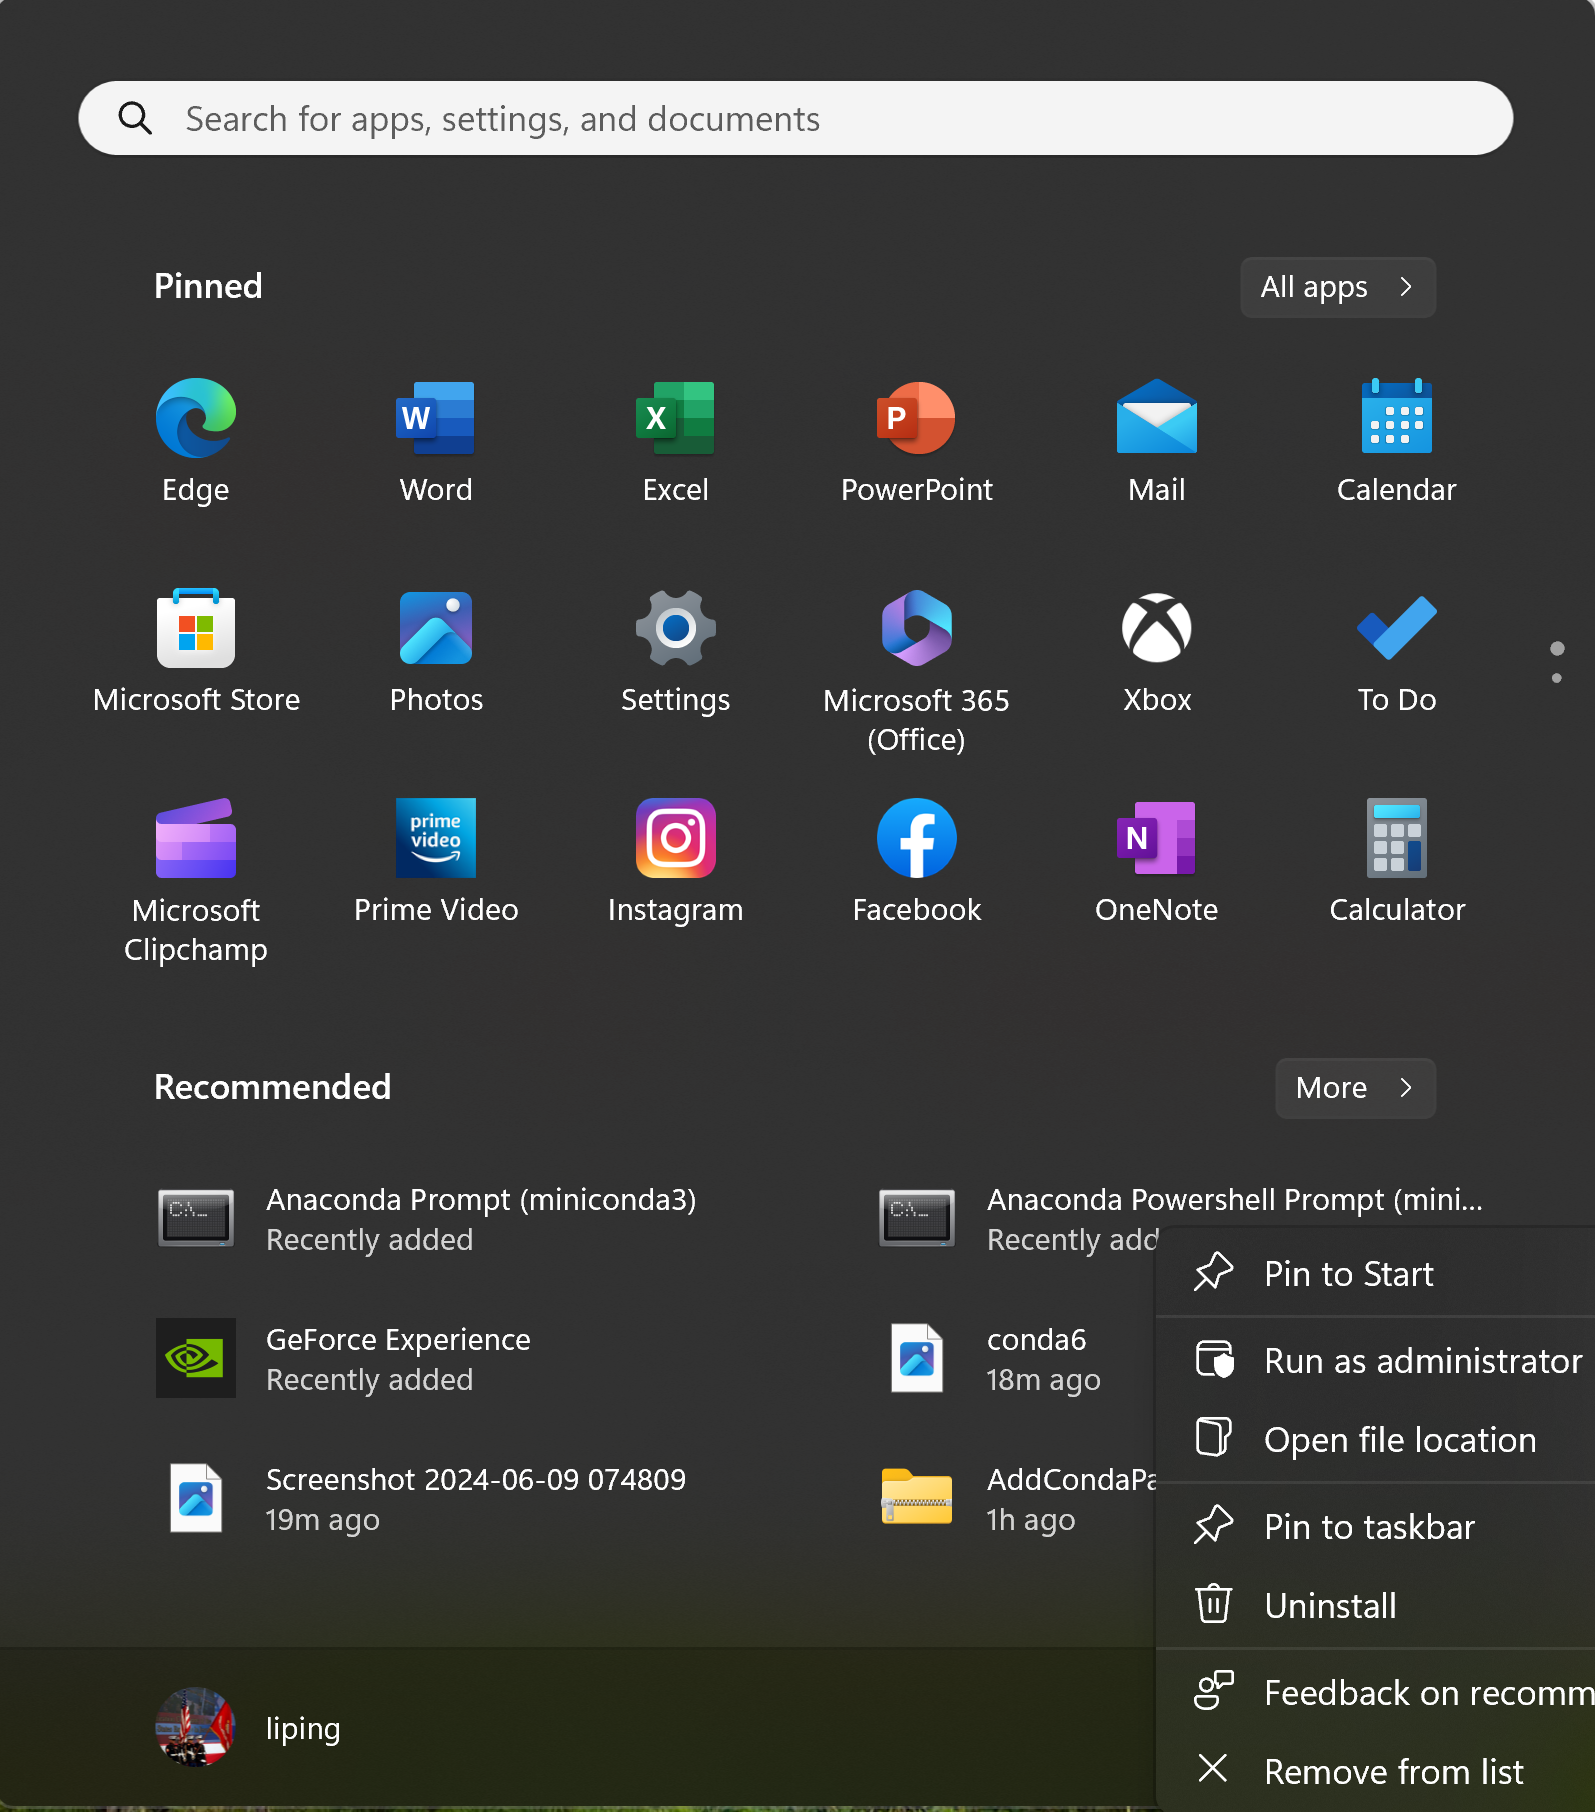
- Click Windows menu, right mouse click on Anaconda Powershell Prompt and choose to Run as Administrator and run the commands one by one to create a new virtual environment called TF and install required packages in it.
- Run the following command to create conda environment r-tensorflow with Tensor Flow 2.10 for R:
Note:
- Make sure you run the commands one by one, not all of them once. Press key "y" when prompted with "Proceed ([y]/n)?"
- REM is for remarks, not command
- optional steps are not needed if there is no error in prior command
- Install all packages using conda except for tensorflow pacakge. "conda install tensorflow==2.10" will not enable GPU support for some reason. So please use pip to install tensorflow,
        REM update base environment
        conda install -n base conda-libmamba-solver
        python -m pip install --upgrade pip
        conda update -n base -c defaults conda
        REM create and activate new virtual environment r-tensorflow
        conda create --name r-tensorflow python=3.9
        conda activate r-tensorflow
         REM install NVidia cuDDD and CUDA for GPU
         conda install -c conda-forge cudatoolkit=11.2 cudnn=8.1.0 --solver=libmamba
         REM install Tensor Flow 2.10
         conda install packaging==23.0
         conda install toolz
         pip install tensorflow==2.10

         REM downgrade numpy
         pip uninstall numpy
         conda install numpy==1.26.4

Note that Tensor Flows 2.10 is incompatible with NumPy 2, so we downgrade numpy to version 1 from 2:

         pip uninstall numpy
         conda install numpy==1.26.4
Testing Tensor Flow

That is it! Please test if the installed Tensor Flow package is supporting GPU:
        python -c "import tensorflow as tf; print(tf.config.list_physical_devices('GPU'))"

To verify the CPU support:
        python -c "import tensorflow as tf; print(tf.reduce_sum(tf.random.normal([1000, 1000])))"

You may also go to Python (by type "python" command) and verify the following inside Python console:

        from tensorflow.python.client import device_lib
        print(device_lib.list_local_devices())
STOP: if you just want to install Tensor Flow for R, stop here if the test is successful.
Follow Install Tensor Flow for R  to finish setup for R.
Removing Virtual Environment

In case you need to remove the virtual environment "r-tensorflow", first exit out of the environment using command "conda deactivate".
To list all environments, use command "conda env list". To remove the "tf" environmenent,
conda remove --name r-tensorflow --all
Install Tensor Flow and IDE Tools (Spyder and Jupyter Notebook) for Machine Learning in Python
Note the following before installation:
- Make sure you run the commands one by one, not all of them once. Press key "y" when prompted with "Proceed ([y]/n)?"
- Install all packages using conda except for tensorflow pacakge. "conda install tensorflow==2.10" will not enable GPU support for some reason. So please use pip to install tensorflow,
- In the future, try to use conda to install new packages. Mixing pip and conda may cause package configuration conflicts.
- The following commands will install not only tensor flow with GPU support but also two IDEs: Jupyter Lab and Spyder, which will also have GPU supports.
- All the commands should run without any warnings or errors. If there is any, go back to the prior steps to check if some steps were not performed or performed incorrectly.
- Tensor Flow 2.10 runs on NumPy 1.x but some other packages such as scipy and pandas will install NumPy 2.x by default. Tensor Flow will stop working after installing these packages. Solution is to downgrade numpy to version 1.
First, it is recommended to create a new conda environment with Tensor Flow 2.10 as we did above.
Let us name it "tf" and install it as follows:

Open Anaconda Powershelll as Administrator and run the following commands one by one:
        REM update base environment
        conda install -n base conda-libmamba-solver
        python -m pip install --upgrade pip
        conda update -n base -c defaults conda
        REM create and activate new virtual environment tf
        conda create --name tf python=3.9
        conda activate tf
         REM install NVidia cuDDD and CUDA for GPU
         conda install -c conda-forge cudatoolkit=11.2 cudnn=8.1.0 --solver=libmamba
         REM install Tensor Flow 2.10
         conda install packaging==23.0
         conda install toolz
         pip install tensorflow==2.10

         REM downgrade numpy
         pip uninstall numpy
         conda install numpy==1.26.4
Test if the installed Tensor Flow package is supporting GPU:
python -c "import tensorflow as tf; print(tf.config.list_physical_devices('GPU'))"
If the test spits out your NVidia GPU card successfully, continue to run the following commands:
conda install pandas==2.1.1
conda install scikit-learn==1.5.2
conda install scipy==1.13.1
conda install seaborn==0.13.2
conda install matplotlib==3.9.2
conda install spyder==6.0.1
conda install notebook==7.2.2
The above packages have been verified to be compatible with Python 3.9 and Tensor Flow 2.10. In the future, use command

    conda search --info XYZ

to find compatible versions of XYZ to install.
Now you can type "jupyter lab" to open Jupyter Notebook:
conda activate tf
jupyter lab
or "spyder" to run Spyder 6:
conda activate tf
spyder
Run the following commands in Spyder or Notebook to test if Tensor Flow package is supporting GPU:
        from tensorflow.python.client import device_lib
        print(device_lib.list_local_devices())
Removing Virtual Environment

In case you need to remove the virtual environment "tf", first exit out of tf environment using command "conda deactivate".
To list all environments, use command "conda env list". To remove the "tf" environmenent,
conda remove --name tf --all
Running Tensor Flow Library

Each time to open Anaconda Prompt, make sure to re-activate tf environment before going to Python,
Jupyter Notebook, and run simply run python scripts:

        conda activate tf

Then you can type "spyder" command to open Spyder IDE or "jupyter lab" to open Jupyter Notebook.
For Jupyter Notebook, change the directory to the root directory by using command "cd c:\" before
the command "jupyter lab" so that you can save and open notebooks to your desired locations.
Install PyTorch with CUDA Support
It seems straightforward to install Pytorch with CUDA support:
- Check the applicable version of CUDA Toolkit for your GPU card as for Tensor Flow.
- Install Miniconda as above and create a new conda environment, e.g., conda create --name torch python=3.9
- Activate the conda environment: conda activate torch
- Go to https://pytorch.org/get-started/locally/ to create a command for your installation. For example, if I choose Stable Build 2.5 for Windows with CUDA 11.8, then the command is:
conda install pytorch torchvision torchaudio pytorch-cuda=11.8 -c pytorch -c nvidia
- Test the installation by going to python and run the following code:
import torch
print(torch.cuda.is_available())
print(torch.cuda.get_device_name(0))
Experimental Example: Movie Reviews Classification
In this experiment, I tested the advantage of TensorFlow using GPU by comparing two machines that run the same TensorFlow sequential model. The first machine is Microsoft Surface Studio 2 with Intel i7 and 16GB RAM. I run the training task without using GPU acceleration. The second machine is HP Omen 45L with Intel i7 with 64GB RAM and NVidia RTX 3080 graphics card, which was used for TensorFlow acceleration. The difference is dramatic. The training task takes 3 minutes and 30 seconds on the second machine and over 107 minutes in the first machine. Even on the same second machine, without GPU acceleration, the time it takes is at least 10 times more.
In this task, we will load a data set of 50,000 movie reviews from IMDB and their class labels. We will try to train a neural network using 25000 reviews and then use the trained model to predict the labels for the remaining 25000 reviews. First, let us load TensorFlow library and its IMDB data set:
import tensorflow as tf
from tensorflow import keras
# Load data
imdb = keras.datasets.imdb
The actual reviews are made of words but have been coded using word index. We can look up the index, which maps each word to an index number, as follows:
# A dictionary mapping words to integers
word_index = imdb.get_word_index()
The word_index is a dictionary of all words and their indices, and so we can get a list of words using word_index.keys() and a list of indices using word_index.values(), from which, we can find the range of the index values is 1:88584 and there are 88584 words in the vocabulary.
import numpy as np
values = list(word_index.values())
max = np.max(values)
maxPosition = np.argmax(values)
words = list(word_index.keys())
word = words[maxPosition]
size = len(values)
print(f'there are {size} words in vocabulary, the largest index is {max} which is for the word {word}')
We can reverse the mapping of word_index so that we can use the index to find words:
index_word = dict([(value, key) for (key, value) in word_index.items()])
Now we can load IMDB data set into four lists: train_data, train_labels, test_data, and test_labels, using the entire vocabulary of 88584 words:
(train_data, train_labels), (test_data, test_labels) = imdb.load_data(num_words=88584)
If your computer is not able to handle the large number of words, we can use the most frequent 10000 words in the vocabulary too:
(train_data, train_labels), (test_data, test_labels) = imdb.load_data(num_words=10000)
Now we can explore the data: train_labels and test_labels are just two list of class labels of 0 and 1, train_data and test_data are two lists of integers representing the indices of the words in each review. For example, train_data[5] is the fifth review in train_data and train_labels[5] is its classification.
We can use the following function to recover the actual review from the indices.
# recover text from word indices
def decode_text(indices):
result = ''
for i in indices:
result = result + ' ' + index_word.get(i, '?')
return result
Now, if we want to read the actual review in the first review:
txt = train_data[5]
decode_text(txt)
Now let us prepare the data for training. First, we will reserve first four indices for special words like as padding words to make all reviews of the same length and for the marker of the beginning of each review.
word_index = {k: (v + 3) for k, v in word_index.items()}
word_index[""] = 0
word_index[""] = 1
word_index[""] = 2
word_index[""] = 3
Because the above addition of four words into the word_index, we need to change decode_text function slightly:

def decode_text(indices):
 result = ''
 for i in indices:
     if i != 0:
         result = result + ' ' + index_word.get(i, '?')
 return result
Second, we are going to pad all reviews to the length. To give us an idea, how many words we should pad to, let us find out what is the longest reviews in the data set using the following function:
def find_max_words(lstWords):
max = len(lstWords[0])
for i in range(len(lstWords)):
if len(lstWords[i]) > max:
max = len(lstWords[i])
return max
print(f' the longest review has {find_max_words(train_data)} words in training data')
print(f' the longest reivew has {find_max_words(test_data)} words in test data')
We found that the longest review is about 2500 words, and so we pad every review to 2500 words, which will add 0, or word , to the end of each review, padding="post", up to 2500 words:
train_data = keras.preprocessing.sequence.pad_sequences(train_data, value=word_index[""], padding='post', maxlen=2500)
test_data = keras.preprocessing.sequence.pad_sequences(test_data, value=word_index[""], padding='post', maxlen=2500)
Finally, let us create, train, and evaluate a model that is made of six layers: word embedding lay mapping 88584 input word nodes to 256 outputs, the second lay does convolutional pooling, the third layer made of 256 nodes using RELU activation, the fourth layer is a dropout for regularization, the fifth layer made of 256 nodes with RELU activation, and the final layer made of one node for predicting class label.
vocab_size = 88584
model = keras.Sequential([
keras.layers.Embedding(vocab_size, 256),
keras.layers.GlobalAveragePooling1D(),
keras.layers.Dense(256, activation=tf.nn.relu),
keras.layers.Dropout(0.2),
keras.layers.Dense(256, activation=tf.nn.relu),
keras.layers.Dense(1, activation=tf.nn.sigmoid)
])
model.compile(optimizer='adam', loss='binary_crossentropy', metrics=['acc'])
# Split data into validation and train sets
x_val, y_val = train_data[:10000], train_labels[:10000]
partial_x_train, partial_y_train = train_data[10000:], train_labels[10000:]
# Start learning
model.fit(partial_x_train, partial_y_train, batch_size=512, epochs=200, validation_data=(x_val, y_val))
# evaluate model will produce both loss value and accuracy values:
results = model.evaluate(test_data, test_labels)
print(results)
As a way to demonstrate the performance of the model, we can print 100 test reviews and their predictions:
COUNT = 100
test_data_print, test_labels_print = test_data[:COUNT], test_labels[:COUNT]
predictions = model.predict(test_data_print)
for i in range(COUNT):
print("Review: " + decode_text(test_data_print[i]))
pred = predictions[i][0]
value = test_labels_print[i]
print("Prediction / Value: " + str(pred) + " / " + str(value))
if (pred < 0.5) != (value < 0.5):
print('\x1b[1;31mIncorrect prediction')
else:
print('\x1b[1;32mCorrect prediction')
print('\x1b[0m')
GPU Compute Capability vs CUDA Toolkit Version
In the above installation, we installed CUDa Toolkit 11.2 and cuDNN version 8.1.0 for TensorFlow 2.10 in Python 3.9. The choices are not arbitrary, and in fact, you need to decide them based on GPU card. Here is a simple guideline for making the choices:
1) For native windows, TensorFlow 2.10 is the last supported version, which works for Python 3.9 -- 3.11 only. So, the last python version (3.12 at this point) is not a choice.
2) To decide CUDA Toolkit version, use the following chart. Unless you have a very old GPU, version 11.8 is good for GPUs with compute capabilities between 3.5 and 9.0. Also, note that earlier versions of CUDA Toolkit may not recognize later versions of Visual Studio. To find out your GPU's compute capabilities, go to CUDA - Wikipedia. A list of CUDA Toolkits is listed here: CUDA Toolkit Archive | NVIDIA Developer.
Note: CUDA SDK 10.2 is the last official release for macOS, as support will not be available for macOS in newer releases.
3) cnDNN has to CUDA Toolkit, when you download cuDNN, you will be asked to choose the matching version of cuDNN based the version of CUDA Toolkit. A list of cuDNN libraries are available here: cuDNN Archive | NVIDIA Developer. Note you need to logon to NVidia to be able to download.
Compute Capability (CUDA SDK support vs. Microarchitecture)
CUDA SDK
version(s) | Tesla | Fermi | Kepler
(early) | Kepler
(late) | Maxwell | Pascal | Volta | Turing | Ampere | Ada
Lovelace | Hopper |
|---|
| 1.0[34] |
1.0 – 1.1 |
|
|
|
|
|
|
|
|
|
|
| 1.1 |
1.0 – 1.1+x |
|
|
|
|
|
|
|
|
|
|
| 2.0 |
1.0 – 1.1+x |
|
|
|
|
|
|
|
|
|
|
| 2.1 - 2.3.1[35][36][37][38] |
1.0 – 1.3 |
|
|
|
|
|
|
|
|
|
|
| 3.0 - 3.1[39][40] |
1.0 |
2.0 |
|
|
|
|
|
|
|
|
|
| 3.2[41] |
1.0 |
2.1 |
|
|
|
|
|
|
|
|
|
| 4.0 - 4.2 |
1.0 |
2.1 |
|
|
|
|
|
|
|
|
|
| 5.0 - 5.5 |
1.0 |
|
|
3.5 |
|
|
|
|
|
|
|
| 6.0 |
1.0 |
|
|
3.5 |
|
|
|
|
|
|
|
| 6.5 |
1.1 |
|
|
|
5.x |
|
|
|
|
|
|
| 7.0 - 7.5 |
|
2.0 |
|
|
5.x |
|
|
|
|
|
|
| 8.0 |
|
2.0 |
|
|
|
6.x |
|
|
|
|
|
| 9.0 - 9.2 |
|
|
3.0 |
|
|
|
7.0 |
|
|
|
|
| 10.0 - 10.2 |
|
|
3.0 |
|
|
|
|
7.5 |
|
|
|
| 11.0[42] |
|
|
|
3.5 |
|
|
|
|
8.0 |
|
|
| 11.1 - 11.4[43] |
|
|
|
3.5 |
|
|
|
|
8.6 |
|
|
| 11.5 - 11.7.1[44] |
|
|
|
3.5 |
|
|
|
|
8.7 |
|
|
| 11.8[45] |
|
|
|
3.5 |
|
|
|
|
|
|
9.0 |
| 12.0 - 12.3 |
|
|
|
|
5.0 |
|
|
|
|
|
9.0 |
|